The building of the first Midivid video sampler was documented to offer ideas to other DIY computer designers.
It was custom built in early 2000 to house a 766lmrt all in one motherboard and a P2/350. The rack mount case cost around $80 CDN in parts and was built in one afternoon, using a Dremel as the only power tool.
It is very light, offers room for prototyping, and has performed flawlessly so far. This computer gets bolted in an SKB 4 space road case for live use.
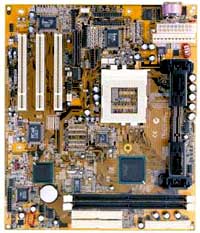
Why the 766LMRT
At the time, and After extensive research in "All-in-one" motherboards, It was concluded that with it's on board agp video/audio/modem/lan and a UDMA33 bus, The 766lmrt offered the perfect baby AT package for low cost ($100 CDN) VJ application.
The intel 810 chipset was properly integrated in this model and offered great live peformance stability. The audio chipset matched soundblaster quality performance, with acceptable MIDI/video timing.
The add-on peripherals all came in the form of separate connectors, which lets you put I/O anywhere you like and the motherboard will accept AT and ATX power supplies. These are handy otions for the DIY artist.

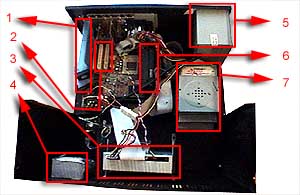
Rear view
1. keyboard
connector
2. joystick/MIDI port
3. serial port
4. VGA port
5. line in/out & mic in
6. PS2 mouse, IR & 2 USB ports
7. 56k MODEM
8. 10/100 LAN
9. Additional fans for better air circulation
Inside the case
The metal motherboard mounting plate and PCI card mounting hardware were pop riveted into the bottom and back of the rack mount case. The motherboard sit on standard motherboard plastic mounts and get screwed down just like it would in the original computer case.
The power supply (5) was riveted into the back plate. The hard and floppy drive mount (7) is riveted onto the case bottom of the case. The cdrom mounting hardware (3) is riveted into the top and front plate, adding solidity.
There is also a block of foam (4) used to push the cards and fans (1) into the PCI slots (2). The whole thing assemble in two parts and becomes a very solid piece when assembled.
There is also a power on button and two leds, mounted into the face plate.
1. Additional fans
2. PCI slots
3. Used 6x CDROM
4. Foam block to hold cards seated.
5. ATX power supply
6. Intel P2/350
7. Floppy (bottom) and hard drive (top) mount
Second Look
The p2/350 (1) combined with the intel 810 chipset gave great results with 320x240 video streams stretched to 640x480. It also had no problems playing back single streams of 640x480 at 30fps, but sticking to a lower resolution gave the extra FX power needed to really have fun..
Care was taken to make sure the back PCI plate (5) was properly aligned with the bottom mother mounting plate (not visible in picture as it is under the motherboard) before drilling and riveting. This is crucial if you want PCI cards to sit properly in their slots.
The dual fan unit (4) was added to help keep the unit cooled in critical situations. The stage is a hot place. The fan unit sit in the far PCI slot and add solidity.
The are 2 Bus mastering PCI slots (3) available for short PCI cards (most today are) and the whole back assembly for screwing in the cards came off the computer case in one piece.
The motherboard will also accept a Celeron (2) up to 533mghz. But the plan is to leave it as is.
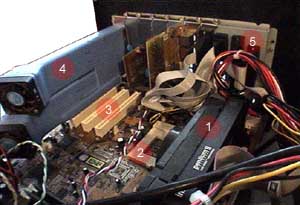
1. Intel P2/350
2. s370 type Celeron socket
3. spare PCI slots
4. Additional dual fan unit
5. Back PCI card plate removed from computer case.
PC100 766 LMRT features
Up
to celeron 533 (socket 370) or P2 450 (slot 1)
66 and 100 mghz front side bus
Up to 512 megs ram (2x256) 66 or 100 mghz
Three 32 bit PCI slots
UDMA33 IDE bus
AT and ATX power connectors
On board LAN & MODEM
PC98 compliant audio
Mpu401 support through joystick port.
Legacy soundblaster support
Two USB ports
On board AGP VGA with motion compensation.